
Integration Builder
Overview
The Integration Builder is where you assemble a complete integration. Using pre-configured
app connections and data mappings, you lay out a
sequence of steps on a canvas, configure each one, and run it.
An integration can be started manually, on a schedule, or by an inbound request.
Triggers
- Manual
- Scheduled (CRON job)
- Invoked API call
- Webhook
- Received HL7 Message
The canvas
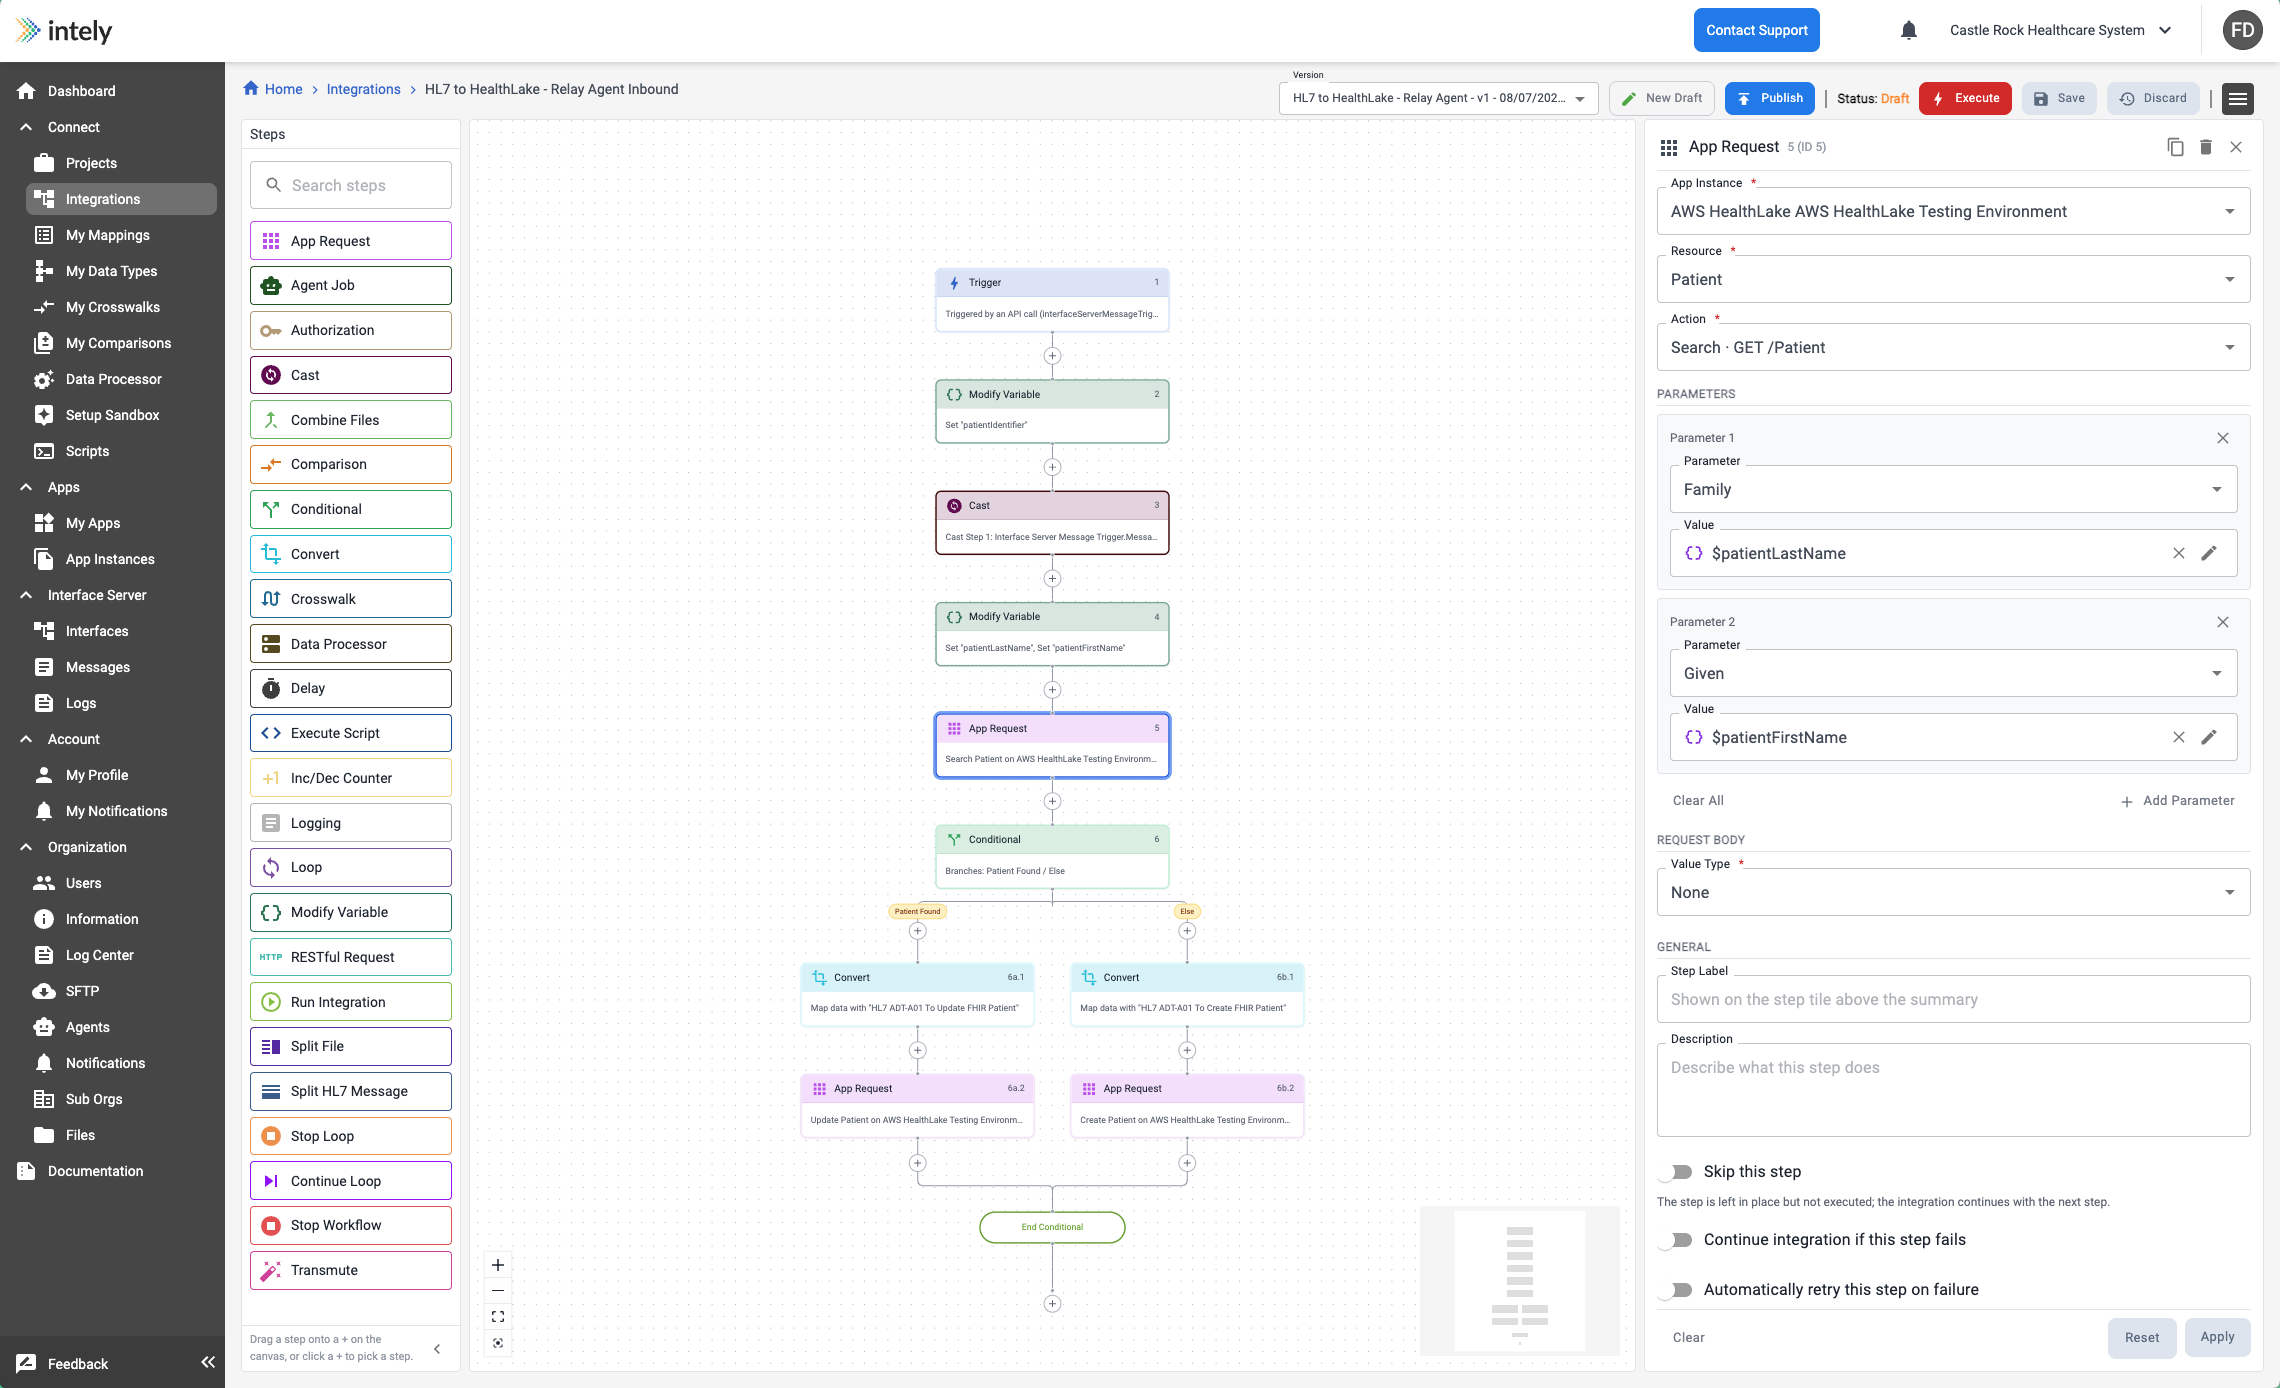
The builder has three regions:
- Step palette on the left — every step type, with a search box. Collapse it with
Hide steps when you need more canvas room. - Canvas in the middle — your integration as a top-to-bottom flow. Conditionals branch and
rejoin, and loops are drawn as a group containing the steps that repeat. - Step drawer on the right — configuration for whichever step is selected. It resizes if a
step needs more room.
To add a step, drag it from the palette onto the canvas, or use the + control on the flow.
Drop targets appear between existing steps, so you can insert into the middle of a sequence
rather than only appending to the end.
Selecting a step opens its editor in the drawer. For details on a specific step type, see the
subpages of this article.
If you see a Switch to Legacy Builder control, you are on the current builder and that
control takes you back to the previous one. The legacy builder's layout differs from what is
described here.
Versions, drafts and publishing
An integration is versioned. The version you are editing is shown at the top, alongside
New Draft, Publish and a Status indicator, plus Execute, Save and
Discard.
Working in a draft is what lets you change a live integration safely: edit the draft, run it
with Execute, and only Publish when you are satisfied. Until then the published version
keeps running unchanged.
Step settings every step shares
Beyond a step's own configuration, each step has a General section in the drawer:
| Setting | What it does |
|---|---|
| Step Label | The name shown on the step tile, above the summary. Worth setting on anything non-obvious. |
| Description | Longer note describing what the step does. |
| Skip this step | Disables the step without deleting it. Useful for isolating a problem. |
| Continue integration if this step fails | The run proceeds instead of stopping at the failure. |
| Automatically retry this step on failure | With a Number of retries. Suited to transient network or upstream errors. |
Skip, continue-on-failure and retry are the three controls that determine how a run behaves
when something goes wrong — they are the most commonly overlooked part of the builder.
Validation
The builder validates as you work and lists anything unresolved in a panel on the canvas.
Selecting an entry takes you to the step it refers to. The panel can be collapsed or dismissed
while you work, and reappears when new problems are found.
Steps
Steps are the building blocks of an integration — pre-built components that perform actions,
requests and transformations.
Interacting with applications
- App Request
- RESTful Request
- Authorization
- Agent Job — run a job on a connected agent
Data conversion and transformation
- Convert
- Crosswalk
- Comparison
- Split HL7 Message
- Cast — cast a value to a specific data type
- Transmute — replace fields in a previous step's result
- Data Processor — execute a data processor job
Conditionals and looping
- Conditional · End Conditional
- Loop · Continue Loop · Stop Loop
Files
Helpers
Variables
You can define custom variables that store values during an integration run, or between runs
(persistent variables). Variables can be used in step inputs to build conditional logic and
logging messages, in app requests as parameters or a request body, and in mappings and
crosswalks.
Variables can be a string, number, boolean, date or object, and can hold a single value or an
array.
To set a variable's value during a run with the Modify Variable step,
leave the value field blank when you define it.
Counters
A counter increments or decrements during a run, or across runs (persistent counters).
Working with the integration itself
The top bar carries actions that apply to the whole integration:
| Action | Notes |
|---|---|
| Settings | Integration-level configuration. |
| Variables / Counters | Define the values described above. |
| Save and Execute | Runs it. Unsaved changes must be saved first, which the builder prompts for. |
| View Executions | Run history, including failures and their step-level detail. |
| Link to Project | Associates the integration with a project, grouping it with the other resources for that piece of work. |
| Copy Integration | Duplicates it — the usual way to build a variant safely. |
| Discard Changes | Reverts to the last saved state. |
| Delete Integration | Removes it. |
Updated about 2 months ago